Hello everyone!
So here we are with the Battle Report I promised you. Now this is another learning game so I am
playing against myself in an attempt to teach myself all the rules of 9th Age. This time the battle will be 2000pts, as was mentioned in my
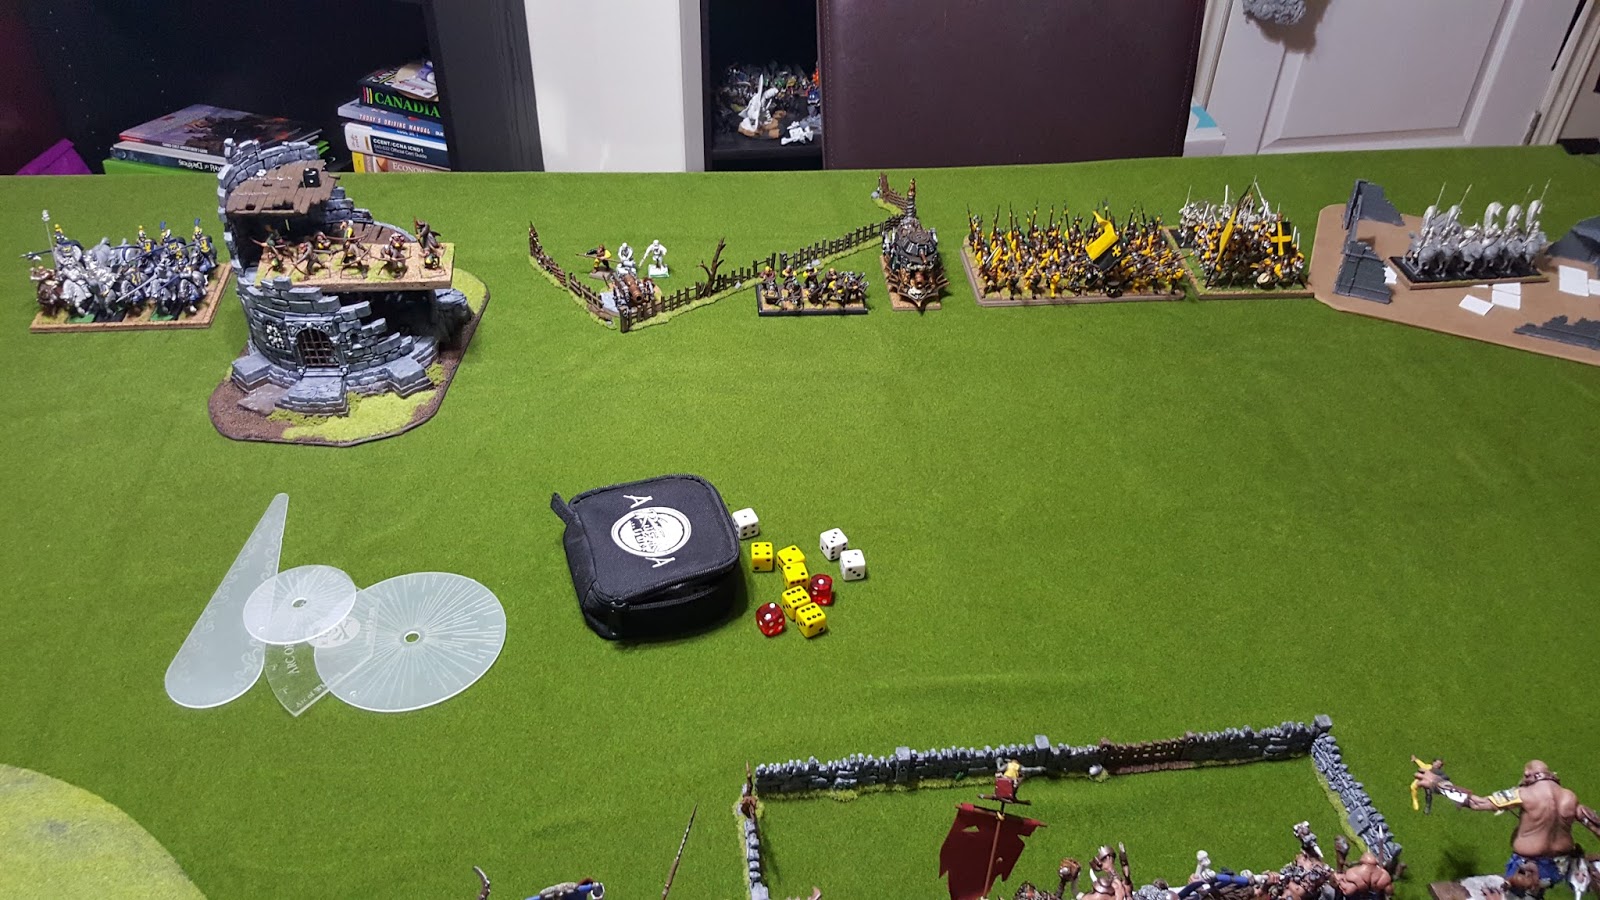
previous post this is a Classic Deployment with Hold the ground secondary
objective. So here’s the army lists and deployment:
Ogre Shaman – Level 4,
path of Butchery, Rottenjaw and Daemon Heart
Ogre Khan – Battle Standard
Bearer, Greatweapon, Armour of Destiny.
Ogre Tribesmen x14 –
Full Command, Extra Handweapon and Heavy armour
Ogre Bruisers x 8 –
Full Command, Flaming Standard
Ogre Bombadiers x 6
Sabretooth Tiger
Yetis x 3
Scratapult
Slave Giant
Marshal – Seasoned general,
Charm of Cursed Iron, Mithril Mail, Great Weapon
Captain – Battle Standard
Bearer, Blessed Armour of Frederick the Great, Great Weapon
Preacher – Barded
warhorse, Great Weapon and Shield
Electoral Calvary x 6 –
Musician, Lance and shield
Heavy Infantry x 50 –
Full Command, Halberds
Light Infantry x 10 –
Crossbows
Artillery – Cannon
Imperial Guard x 30 –
Full Command, Great Weapon
Imperial Rangers x 10
Knightly Orders x 11 –
Full Command, Lance and Shield
Steam Tank
Ogres won first turn so lets get to it!
OGRE TURN 1
Movement:
The Yetis on the flank charge the Electoral Knights, the knights hold. (NOTE: I now realize this was an illegal charge. Illustrates how this battle report is still a learning experience)
The rest of the line marches up except the Scratapult on the hill, which holds, and the Bombadiers, who only move up 6".
Magic:
Roll 3 for magic dice and manage to get off Marrow Drinker making the Tribesmen stubborn.
Shooting:
Ogre Bombadiers shoot the Imperial Guard and manage 6 Wounds. The Scratapult hit the Imperial Knights on the flank and manage no wounds.
Combat:
The Electoral Cavalry pass their fear test. The Yetis hit first and cause 4 wounds, the knights do no wounds back. Cavalry fail their break test and flee off the board and the yetis elected to pursue them.
End of Ogre Turn 1:
EMPIRE TURN 1
Marshal gives order to Brace for Impact to the halberds. The Captain gives On the Double to the Imperial Guard.
Movement:
The Imperial Guard charge the Giant and fail the charge. The Halberds charge the Tribesmen who elect to hold. The halberds fail the charge as well. In the compulsory movement phase the Steam Tank manages to charge the Tribesmen who pass their terror test.
The knights move up on the flank while the remaining shooting units hold position.
Magic:
9 dice to 6 the Preacher only manages to get off Sunna's Blessing, the other spells were dispelled by the Shaman.
Shooting:
The Crossbowmen shoot at the Sabretooth Tiger causing 1 wound. The Imperial Rangers shoot at the Bruisers and cause 1 wound as well. The Cannon fired on the Giant and managed 4 wounds.
Combat:
The Khan Battle Standard made way (although I didn't move him in the unit that banner does not rank up well). The Steam Tank did 4 wounds with it's grind attacks and 2 with it's Steam Gun. The Ogre Tribesmen fail to wound back but the BSB managed 2 wounds with it's great weapon. The Ogres lose by 3 but are stubborn and pass their break test.
OGRE TURN 2
Movement:
The Sabretooth Tiger and the Bruisers both charge the Cannon. The Tiger mages the charge while the Bruisers fail. The Giant moves back a few inches to keep out of range of the Imperial Guard. The Scratapult moves down the hill to threaten the Knights. The Yetis turn to threaten the rear of the Empire battle line, and the Bombadiers move up to threaten the Imperial Guard.
Magic:
11 dice to 6, the Ogre Great Shaman first trys to draw out dice by casting Brain Slurper on the halberds and fails to cast, and thus losing focus. Then trys to cast Marrow Drinker which succeeds Irresistibly, on the Tribesmen and manages to cause no wounds to the Shaman. However this drains the remaining dice and the magic phase ends.
Shooting:
The Bombadiers shoot the Imperial Guard and manage 7 wounds, the Guard pass their panic check. The Scratapult shoots at the Knights once more with a direct hit. The Preacher fails his Look Out Sir and is killed with a Killing Blow. The Scratapult also manages to Killing Blow 3 other knights, they promptly panicked and fled.
Combat:
The Sabretooth Tiger eats two of the Cannon crew, breaks and destroys them. The Tiger overruns off the board. The Steam Tank throws all its attacks into the Khan BSB and fails to wound. The Ogre Tribesmen fail to wound it back but the Khan manages another two wounds. The STeam Tank loses combat but is Unbreakable.
EMPIRE TURN 2
The Marshal and the Captain eat give their respective units Brace for Impact orders.
Movement:
The Halberds charge the Tribesmen and make it. The Imperial Guard charge the Bombadiers who stand and shoot but fail to wound. The Knights on the flank rally and turn to face the Scratapult.
Magic:
No Magic as the Preacher is now dead.
Shooting:
The Crossbowmen and the Imperial Rangers both shoot at the Bruisers and each manages a wound finishing off an Ogre.
Combat:
The Imperial Guard take 3 wounds from the Bombadiers but the Guard manage 11 wounds back. The Bombadiers break but the Guard choose to restrain and turn to face the Giant.
The Marshal challenges to try and get the Khan off of the Steam Tank but the Tribesmen champion accepts. The Champion manages to get 2 wounds through while the Marshal does 1 in return. The Great Shaman activated his Rottenaw, all the Ogres now have poison. The Halberds manage 10 wounds, the Steam Tank manages one wound on the Khan BSB. The Ogres attack back and manage 9 wounds while the BSB only does 1 wound to the Steam Tank this turn. The Ogres lose combat but hold due to still being stubborn from Marrow Drinker.
OGRE TURN 3
Movement:
The Scratapult charges the Knightly Order who hold. The Giant charges into the Halberds already engaged. The Bruisers charge the Crossbowmen who stand and shoot but cause no wounds. The Bombadiers rally and turn the face the Imperial Guard, while the Tiger returns from the board edge and marches up next to the Crossbowmen. The Yetis march forward behind the Empire battle line.
Magic:
5 dice to 4, the Great shaman gets off Entrail Gorger but has Marrow Drinker dispelled.
Shooting:
No shooting this turn.
Combat:
The Scratapult manages only 3 wounds with it's combined Impact hits and attacks while the knights manage to cause 3 back. The combat is tied but the Knights have a musician. The Scratapult breaks from combat and the Knights pursue and catch them.
The Crossbowmen managed to inflict two wounds on the Bruisers before being crushed to death with a total of 12 wounds. The unit was wiped out and the Ogre reformed to face the flank of the Halberds.
The large battle in the center of the table began with the Empire passing their fear test. The Marshal survived the Champions 5 attacks (with a lucky roll of triple 6's for the armour saves) and managed to slay the Ogre champion winning the challenge. The Halberds manage to put two wound on the Giant killing it, but not before the Giant hit back. The rest of the halberds manage to put 6 wounds on the Ogres but the Ogre hit back and killed a total of 21 Halberdiers (when combined with the Giant kills). The steam tank once again failed to wound the BSB but he managed to put another wound on the Steam Tank. The Empire loses combat but is steadfast and passes their break check.
EMPIRE TURN 3
Both units get issued the Steady, Men! order.
Movement:
The Imperial Guard charge the flank of the Tribesmen. The KNights and the Huntsmen both move up to threaten the Bruisers and Tribesmen.
Magic:
No Magic
Shooting:
The Imperial Rangers put two wounds on the Bruisers, killing one.
Combat:
The Great Shaman makes way and challenges. The Imperial Guard Champion accepts and is immediately pasted but the Great Shaman. The Ogres get reduced to the Standard bearer and only cause 3 wounds back. The Khan BSB does manage to finally kill the Steam tank. However it is too late as they break from combat and are caught and destroyed by the Imperial Guard.
OGRE TURN 4
Movement:
The Yetis charge the flank of the Halberds who promptly decide to flee. The Tiger move forward to block the Knights while the Bruisers turn to threaten the Knights. The Bombadiers turn to shoot the Imperial Guard.
Magic:
No Magic
Shooting:
Bombadiers manage 3 wound on the Imperial Guard failing to cause a panic.
Combat:
No combat
EMPIRE TURN 4
Captain BSB gives On the Double order to the Imperial Guard.
Movement:
The Knights charge the Sabretooth Tiger while the Halberds reform and the Imperial Guard swift reform to face the Yetis.
Magic:
No magic.
Shooting:
The Imperial Ranger cause 1 wound on Bruisers.
Combat:
The Knights kill the Tiger and reform the face the Bruisers.
OGRE TURN 5
Movement:
The Bruisers charge the Knights who elect to flee, they try to redirect into the Imperial Guard but fail the charge. The Yetis and the Bombadiers both charge the Imperial Guard who elect to hold.
Magic:
No shooting
Shooting:
No Shooting
Combat:
The Imperial Guard pass their fear test. The Guard throw all their attacks into the Yetis while the Ogres and Yetis manage no wounds on the Guard. The guard win and break the Yetis but the Bombadiers hold. The Guard turn their facing.
EMPIRE TURN 5
The Marshal orders Brace for Impact on the Halberds while the Captain give the Steady, Men! order.
Movement:
Halberdiers charge the Bombadiers in the flank, the Knights rally and the Rangers move up to keep harassing the Bruisers.
Magic:
No Magic
Shooting:
Rangers cause 2 wounds on the Bruisers
Combat:
Ogre do manage to kill 3 Imperial Guard but not before being being reduced to 1 wound. The last Bombadier breaks and runs, both units elect to hold and reform to meet the Bruisers.
OGRE TURN 6
Movement:
One last chance for glory and maybe winning if they can hold the center of the board. The Bruisers charge the Imperial Guard who hold. The Yetis rally but the Bombadier keeps running.
Magic/Shooting
Neither of those left
Combat:
The Ogre champion challenges and the Captain accepts, each manages a wound on the other. The Ogres manage to wipe out the Guard but not before receiving 2 wounds in return. Bruisers win combat but the Captain BSB holds.
EMPIRE TURN 6
The Marshal orders Brace for Impact on the Halberdiers.
Movement:
Halberds charge the Bruisers. The Knights move up to contest the center of the board while the rangers do the same.
Magic:
No magic
Shooting:
The Rangers fire on the Yetis and cause 2 wounds killing one and panicking the other.
Combat:
The Challenge continues and the Captain BSB is killed by the Bruiser champion, the captain causes no wounds back before he dies. The Halberdiers lead by the Marshal however cause 6 wounds, the Ogres lose combat and break. They manage to get away as the remaining units surround the objective on the center of the board.
Battle Result:
Massacre Victory for the forces of the Averholme!
Well that game sure did take a hard swing against the Ogres there but I'd say they able to hold there own. That is twice that I managed to route the Ogres with my Empire. Might have to change up how I deploy the Ogres but I'm still glad how it performed.
Hope you all enjoyed that, until next time!
-Commodus